


")
Litcessory 6-Pin to Cut-End Extension Connector Compatible with Nanoleaf Essentials Lightstrips (2in, 4 Pack, White)
Product Description

6-Pin to Cut-End Extension Connector
NL Essentials only allows for a single continuous lightstrip run. Litcessory products allow for several!
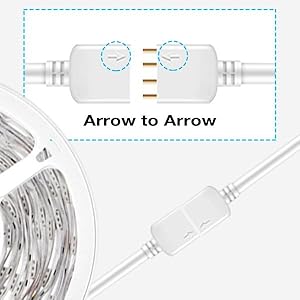
This 6-pin to cut-end extension connector, specifically designed for the NL Essentials Lightstrip system, enables you to connect a cut lightstrip to an uncut NL Essentials Lightstrip Extension or any other Litcessory product (extension cable, splitter, etc.). No more wasting costly lightstrip pieces! You can also use this connector to create corners for your lightstrip run, allowing for more design flexibility than ever before! Our cables are flexible and flat, which makes them inconspicuous – perfect for designing your ideal lighting setup!
NOTE: If you want to connect this product directly to the NL Essentials Lightstrip Controller, you MUST use the Litcessory Controller to 6-Pin adapter to do so.
This product is great for
Reusing the end of a cut lightstripInserting a corner into a lightstrip run
MADE FOR INDOOR DRY LOCATIONS ONLY

Frequently Asked Questions:
Will Litcessory products cause my lightstrip to be dimmer?
No, Litcessory products do not affect the brightness of the lights, as long as your total lightstrip run length (lightstrips plus any Litcessory product length) stays within 10 meters/33 feet, your lights will be just as bright!
What is reverse polarity, and how do I fix it?
Reverse polarity happens when you plug in the wrong side of a 6-pin connector. The flow of electricity gets reversed, and the lightstrip won’t turn on. This is a common occurrence when setting up your project and it is easily fixed.
I used a cut-end connector and now my lightstrip colors don’t match. How do I fix this?
If your lights are not the right colors after connecting a cut-end connector, this means that the cut-end connector is not making a solid connection with the connection points on the lightstrips. Try the following:
Unplug the power sourceEnsure the backside of the connection points (the side opposite of the LED lights) are making contact with the cut-end connector’s metal prongs, and that it is fully inserted.Close the lid of the cut-end connector and clamp down with a pair of pliers. Use plenty of pressure. You should hear a slight “snap”.To ensure your cut-end connector stays tight, you can wrap the cut-end connector tightly with electrical tape.
If you are still having issues after trying the above steps, please contact our awesome support team. We are always happy to help!
I have a cut Lightstrip. How do I connect another Lightstrip to it?
To connect to a cut Lightstrip, you will need a Litcessory Cut-End Connector. We have several options to choose from. Our Cut-End to Cut-End Connectors or our Cut-End to Cut-End Extensions allow you to connect two cut lightstrips with cut ends together. Our Cut-End to 6-Pin Extensions allow you to connect a cut lightstrip to an uncut Lightstrip.
I have a cut lightstrip and I need to add a Litcessory extension cable. How do I connect this? To connect two cut lightstrips together with a Litcessory Extension Cable you will need our Cut-End to 6-Pin Connector. 1. Connect to Cut-End to 6-Pin Connector to each cut lighstrip. 2. Plug the extension cable into the 6-pin side of the Cut-End to 6-pin connector
Can I split cut ends? Yes, you can do that by using first converting your cut-end into a 6-pin end by using our Cut-End to 6-Pin Extension or our Cut-End to 6-Pin Adapter and adding our extension cable to it.

How to install the Cut-End Connector Step 1
Close the connector lid.Use a pair of pliers to apply a good amount of pressure to the lid and ensure it snaps closed.To ensure your cut-end connector stays tight, you can wrap the cut-end connector tightly with electrical tape.

How to install the Cut-End Connector Step 2
Cut down the center of the solder points with a pair of sharp scissors.

How to install the Cut-End Connector Step 3
Insert the cut lightstrip into the cut-end connector.Ensure that the lightstrip is fully inserted and that the solder points are beneath the metal prongs.

How to install the Cut-End Connector Step 4
Close the connector lid.Use a pair of pliers to apply a good amount of pressure to the lid and ensure it snaps closed.To ensure your cut-end connector stays tight, you can wrap the cut-end connector tightly with electrical tape.
Step 1
Step 2
Step 3
Step 4
Connection Type

Add to Cart
Add to Cart
Add to Cart
Add to Cart
Add to Cart
Customer Reviews
3.6 out of 5 stars
4
3.6 out of 5 stars
7
—
2.4 out of 5 stars
3
3.6 out of 5 stars
33
4.0 out of 5 stars
183
Price
$20.29$20.29 $18.19$18.19 $20.39$20.39
— $27.19$27.19 $19.29$19.29
Compatible with Philips Nanoleaf Lightstrip Plus
✓
✓
✓
✓
✓
✓
Can be placed between the controller and the first lightstrip
Yes, with the use of our Controller to 6-Pin Adapter Yes, with the use of our Controller to 6-Pin Adapter – – Yes, with the use of our Controller to 6-Pin Adapter –
Supports lightstrip runs up to 33 feet/10 meters (lightstrips and extension cables combined)
✓
✓
✓
✓
✓
–
Cable is UL Listed
–
✓
✓
✓
✓
–
Indoor/Outdoor
Indoor Only Indoor Only Indoor Only Indoor Only Indoor Only Indoor Only
Connection Type
6-Pin to Cut-End 6-Pin to Cut-End Cut-End to Cut-End Cut-End to Cut-End 6-Pin to 6-Pin –
6-Pin Connector Removable?
✓
✓
– –
✓
–
Endless Design — create breaks in your lightstrips, run lights under cabinets, create lighting for shelves, or connect lightstrips across an entire room — the possibilities are endless!
Easy Installation — easy to use! Our cables are flat & flexible and all pin connectors are removable.
Tech Specs — designed for the Nanoleaf Essentials Lightstrip system, supports runs up to 33 feet (10 meters), cable is UL listed, made for indoor locations only.
Required — if you want to connect this product directly to the Philips Lightstrip Controller, you must use our Controller to 6-Pin Adapter.
Litcessory’s 2 Year Warranty — We know you’ll love this product, but if you have any issues at all, just send us a message and we’ll be happy to assist!
$20.29
Compare


Price: $20.29
(as of Jan 10, 2025 14:03:15 UTC – Details)

Product Description
6-Pin to Cut-End Extension Connector
NL Essentials only allows for a single continuous lightstrip run. Litcessory products allow for several!
This 6-pin to cut-end extension connector, specifically designed for the NL Essentials Lightstrip system, enables you to connect a cut lightstrip to an uncut NL Essentials Lightstrip Extension or any other Litcessory product (extension cable, splitter, etc.). No more wasting costly lightstrip pieces! You can also use this connector to create corners for your lightstrip run, allowing for more design flexibility than ever before! Our cables are flexible and flat, which makes them inconspicuous – perfect for designing your ideal lighting setup!
NOTE: If you want to connect this product directly to the NL Essentials Lightstrip Controller, you MUST use the Litcessory Controller to 6-Pin adapter to do so.
This product is great for
Reusing the end of a cut lightstripInserting a corner into a lightstrip run
MADE FOR INDOOR DRY LOCATIONS ONLY
Frequently Asked Questions:
Will Litcessory products cause my lightstrip to be dimmer?
No, Litcessory products do not affect the brightness of the lights, as long as your total lightstrip run length (lightstrips plus any Litcessory product length) stays within 10 meters/33 feet, your lights will be just as bright!
What is reverse polarity, and how do I fix it?
Reverse polarity happens when you plug in the wrong side of a 6-pin connector. The flow of electricity gets reversed, and the lightstrip won’t turn on. This is a common occurrence when setting up your project and it is easily fixed.
I used a cut-end connector and now my lightstrip colors don’t match. How do I fix this?
If your lights are not the right colors after connecting a cut-end connector, this means that the cut-end connector is not making a solid connection with the connection points on the lightstrips. Try the following:
Unplug the power sourceEnsure the backside of the connection points (the side opposite of the LED lights) are making contact with the cut-end connector’s metal prongs, and that it is fully inserted.Close the lid of the cut-end connector and clamp down with a pair of pliers. Use plenty of pressure. You should hear a slight “snap”.To ensure your cut-end connector stays tight, you can wrap the cut-end connector tightly with electrical tape.
If you are still having issues after trying the above steps, please contact our awesome support team. We are always happy to help!
I have a cut Lightstrip. How do I connect another Lightstrip to it?
To connect to a cut Lightstrip, you will need a Litcessory Cut-End Connector. We have several options to choose from. Our Cut-End to Cut-End Connectors or our Cut-End to Cut-End Extensions allow you to connect two cut lightstrips with cut ends together. Our Cut-End to 6-Pin Extensions allow you to connect a cut lightstrip to an uncut Lightstrip.
I have a cut lightstrip and I need to add a Litcessory extension cable. How do I connect this? To connect two cut lightstrips together with a Litcessory Extension Cable you will need our Cut-End to 6-Pin Connector. 1. Connect to Cut-End to 6-Pin Connector to each cut lighstrip. 2. Plug the extension cable into the 6-pin side of the Cut-End to 6-pin connector
Can I split cut ends? Yes, you can do that by using first converting your cut-end into a 6-pin end by using our Cut-End to 6-Pin Extension or our Cut-End to 6-Pin Adapter and adding our extension cable to it.
How to install the Cut-End Connector Step 1
Close the connector lid.Use a pair of pliers to apply a good amount of pressure to the lid and ensure it snaps closed.To ensure your cut-end connector stays tight, you can wrap the cut-end connector tightly with electrical tape.
How to install the Cut-End Connector Step 2
Cut down the center of the solder points with a pair of sharp scissors.
How to install the Cut-End Connector Step 3
Insert the cut lightstrip into the cut-end connector.Ensure that the lightstrip is fully inserted and that the solder points are beneath the metal prongs.
How to install the Cut-End Connector Step 4
Close the connector lid.Use a pair of pliers to apply a good amount of pressure to the lid and ensure it snaps closed.To ensure your cut-end connector stays tight, you can wrap the cut-end connector tightly with electrical tape.
Step 1
Step 2
Step 3
Step 4
Connection Type
Add to Cart
Add to Cart
Add to Cart
Add to Cart
Add to Cart
Customer Reviews
3.6 out of 5 stars
4
3.6 out of 5 stars
7
—
2.4 out of 5 stars
3
3.6 out of 5 stars
33
4.0 out of 5 stars
183
Price
$20.29$20.29 $18.19$18.19 $20.39$20.39
— $27.19$27.19 $19.29$19.29
Compatible with Philips Nanoleaf Lightstrip Plus
✓
✓
✓
✓
✓
✓
Can be placed between the controller and the first lightstrip
Yes, with the use of our Controller to 6-Pin Adapter Yes, with the use of our Controller to 6-Pin Adapter – – Yes, with the use of our Controller to 6-Pin Adapter –
Supports lightstrip runs up to 33 feet/10 meters (lightstrips and extension cables combined)
✓
✓
✓
✓
✓
–
Cable is UL Listed
–
✓
✓
✓
✓
–
Indoor/Outdoor
Indoor Only Indoor Only Indoor Only Indoor Only Indoor Only Indoor Only
Connection Type
6-Pin to Cut-End 6-Pin to Cut-End Cut-End to Cut-End Cut-End to Cut-End 6-Pin to 6-Pin –
6-Pin Connector Removable?
✓
✓
– –
✓
–
Endless Design — create breaks in your lightstrips, run lights under cabinets, create lighting for shelves, or connect lightstrips across an entire room — the possibilities are endless!
Easy Installation — easy to use! Our cables are flat & flexible and all pin connectors are removable.
Tech Specs — designed for the Nanoleaf Essentials Lightstrip system, supports runs up to 33 feet (10 meters), cable is UL listed, made for indoor locations only.
Required — if you want to connect this product directly to the Philips Lightstrip Controller, you must use our Controller to 6-Pin Adapter.
Litcessory’s 2 Year Warranty — We know you’ll love this product, but if you have any issues at all, just send us a message and we’ll be happy to assist!
Based on 0 reviews
Be the first to review “Litcessory 6-Pin to Cut-End Extension Connector Compatible with Nanoleaf Essentials Lightstrips (2in, 4 Pack, White)”
Related products
-
Smart LED Strips
HitLights 32.8ft LED Strip Lights, RGB 5050 Color Changing LED Light Kit Ultra Brighter 300LEDs Flexible Light Strips with RF Remote and UL Power Supply for Home Room Party TV Bedroom
 Smart LED Strips
HitLights 32.8ft LED Strip Lights, RGB 5050 Color Changing LED Light Kit Ultra Brighter 300LEDs Flexible Light Strips with RF Remote and UL Power Supply for Home Room Party TV Bedroom
From the brand


RGB LED Strip Light KIT
White LED Strip Lights
Power Supply & Dimmable Driver
Heavy Duty Mounting Tape
Standard Density LED Strip
How did we get our start?
HitLights has been specializing in LED services since 2010. We have become a major player and recognized name in the American Strip Lighting LED market in both commercial and residential industries.
What makes our products unique?
HitLights carry everything you need to achieve your desired lighting effects for your project, including linear lighting, power supply, controller, dimmer, mounting tape, etc
Why do we love what we do?
We aim to inspire and develop new ways of utilizing LED Strip Lighting Technology and provided a vast range of customization lighting components
Package Dimensions : 6.78 x 6.74 x 2.52 inches; 1.13 ounces
Item model number : L1012V-MC1-3230-k
Date First Available : March 28, 2019
Manufacturer : HitLights
ASIN : B07NTJBSZN
Country of Origin : ChinaUltra Bright LED Lights for Room. Compared with the single-layer PCB material light strips used by other buyers, HitLights uses SMD 5050 Double PCB Board Layer carries more current for smooth and even illumination without spotting. There are no obvious color differences at both ends.
Easy Installation. This all-in-one kit includes a two-step installation process, including ①UL adapter – 36W DC power supply, more durable and safe ②RF remote control – wireless and 360-degree remote control, maximum control distance 66ft ③10M strip light – Premium 10M LED strip lights with accessories, great DIY choice. Please make sure that “Arrow Symbol ” and “Positive” are on the same side before use.
Multi Applications and DIY Opinions. Led tape lights is cuttable between every 3 leds. You can cut off extra strips to adjust to a proper length. NOTE! Connectors NOT included, if you need more please buy at our storefront,These LED strip lights are the great decoration for any home space, it adds more color to your living room, bedroom, home, kitchen, and work desk, even to the back of your TV.
Upgrade Strong Adhesive. In order to solve the customer’s troubles of the light strip adhesive, we have used upgraded adhesive and adhesive backed wire clips for solve this problem. No need to worry about the falling off of the adhesive.The 12V adapter has UL certification, which is safer to use and more durable.
Safe and Efficient. Excellent Ambient Light Kit for the Halloween and Christmas! HitLights US-based customer service team can be-contacted at any time with any questions regarding purchase or installation.SKU: n/a -
Smart LED Strips
DAYBETTER RGB Led Light Strips Kit Work with Alexa and Google Assistant, Smart WiFi Led Strip Lights for Bedroom, Room, Decor, Kitchen, Home Party Decoration (100FT)
") Smart LED Strips
Smart LED StripsDAYBETTER RGB Led Light Strips Kit Work with Alexa and Google Assistant, Smart WiFi Led Strip Lights for Bedroom, Room, Decor, Kitchen, Home Party Decoration (100FT)
Product Description

Package Content:
led strip lights [Non-Waterproof] 1* Power adapter 1* 24 keys remote controller [Control distance: 5 meter (must be poniting at the sensor without any obstacles)] 1* IR receiver (control box) 1* User manul


DAYBETTER Led Lights
Led strips are also applicable for the decoration of TV backlight and computer, which balances the brightness of unlighted wall and your tv PC screen to greatly decrease your eyes strain.
Atmosphere Light Strips
DAYBETTER led lights can add colorful lights for holidays, events, parties, shows, exhibitions to builds a wonderful and romantic ambiance.
Decorative Strip Lights
Led wall decor, is suitable for lighting the kitchen, bedroom, living room, mirror, it also can be placed under the ceiling, under cabinets, etc.
Installation Steps


Multicolor and color changing control via phone app
DAYBETTER phone app for Android smartphones can be downloaded through the Google play store, IOS through the Apple store. Scan the QR code to get a quick download channel;Once the app is done loading, find the 2.4G WiFi or WLAN settings in general phone settings turn it to ‘ON’, then find the LED network on your list to connect;A registered account is necessary after installing the app for first-time users. Once you see the app has connected to your lights feel free to try them out.
Please make sure the correct connect before lighting the strip lights
Please remove the transparent clip from the remote;Check that the 4-pin connector arrow is aimed at the positive of lights;Every roll lights have one connector to link with the controller box, they should be attached in parallel, not in series. Because: if two rolls of light strips connect together, the second roll will be dimmer than the first roll due to is far away from power.

Stronger adhesive
Strong adhesive lets you place the LED strip almost anywhere, including on the back of TVs, tables, cabinets, and windows.
Tips:
The adhesive is very strong so use caution when using it on white walls or unfinished wood, and please test the product connection and lighting first before decorating your room;If you have any problems or questions about how to use the lights our professional service team can provide assistance within 24 hours.
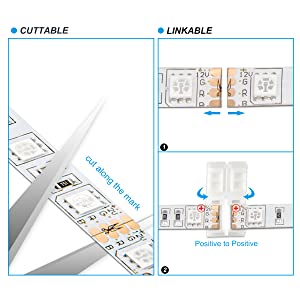
Cuttable & Linkable
Smart LED strip lights can be cut along cutting marks, letting you DIY the strips to a customized length.
Attention:
Once the strips are cut, both ends will need separate power sources;If cuts are made by accident it can be fixed by adding additional connector (NOT included with the package) links.
Please Note:
The WiFi remote control only works on a 2.4G network, and supports both IOS 6.0 or above and Android 4.0 or above operating systems. Voice Control/Assistant is currently supported by Alexa, Google Assistant, and IFTTT, allowing you to turn the lights on or off, dim or bright, set lights to daylight white, soothing green, dancing rainbow, or any pattern you like using only your voice.
Package Dimensions : 8.23 x 8.19 x 0.75 inches; 9.14 ounces
Item model number : TCF02WIFI
Date First Available : July 6, 2021
Manufacturer : DAYBETTER
ASIN : B098QKKZWQApp-Controlled: Use the DAYBETTER app to turn on or change your lights strip’s color; The wifi remote controller only works on the 2.4G network, and they support both IOS 6.0 or above and Android 2.3 or above.To smoothly connect the APP, please put the product and your phone as close as to your home WIFI router, then start pairing them up on APP. Once paring is done, you can move the product to other place within WIFI range
Voice-Controlled & Music Sync: Come with a high sensitivity mic, the led lights syncs with music and ambient sound; With multi-music mode, the lights will change to follow the rhythm or the melody, even can respond to your voice to make the light “dance” to the beat
Work with Smart Speaker: Our smart led light strips can work with alexa and google home assistant, you can via google home or a simple voice command to turn on/off the strip lights, change the light color, dim the brightness
Timer Setting & Schedule: Set the wifi led lights turn on/off at a specific time, and never worry to forgot to turn off your lights, set a timer for your led lights when you wake up in your bedroom to bright the beginning of your day
Strong Self-Adhesive: The led strip lights 100 feet has a strong self-adhesive so they stick very well on TVs, cars, cabinets, and walls; Please test the led strip lights before installation (This lights are Non-waterproof)SKU: n/a -
Smart LED Strips
Govee RGBIC LED Strip Lights, Smart LED Lights for Bedroom, Bluetooth LED Lights APP Control, DIY Multiple Colors on One Line, Color Changing LED Strip Lighting Music Sync, Christmas Decor, 16.4ft
 Smart LED Strips
Govee RGBIC LED Strip Lights, Smart LED Lights for Bedroom, Bluetooth LED Lights APP Control, DIY Multiple Colors on One Line, Color Changing LED Strip Lighting Music Sync, Christmas Decor, 16.4ft
Product Description

The video showcases the product in use.The video guides you through product setup.The video compares multiple products.The video shows the product being unpacked.


1 RGBIC Effects2 DIY
3 Scene Modes
 Strip Light 2 Pro
 Create a vibrant world of colors with upgraded RGBWWIC Govee strip light 2 pro. 120+ preset lighting effects fit various occasions, and personalized holiday lights can be designed with segmented DIY.
 COB Strip Light Pro
 COB LED strip lights are crafted with integrated packaging technology and 1260LEDs/m, translating innovative tech into brighter, smoother, fluid lighting effects,can be used as supplementary lighting.
 Strip Lights with Covers
 LED Strip Lights with Cover are designed with 60 LEDs/m to create softer, uniform, and spot-free lighting effects. Includes an LED Channel, making it ideal for decorative and accent lighting.
 Wi-Fi RGBIC LED Strip Lights
 Compatible with Alexa and Google Assistant, this 100ft Govee LED strip lights for Christmas decor allow you to power on/off, change brightness and color without lifting a finger.
 Wi-Fi RGB LED Light
 Embellish your home with rich colors using Govee RGB strip light. This easy-to-use smart light frees your hands and controls your bedroom, party light through simple voice commands.
Govee Strip Light H617A
Govee RGBIC LED Lights
16.4ft
Size
100ft
Bluetooth
Connectivity
WiFi, Bluetooth
RGBIC
Color
RGBIC
24V 0.5A
Min Input
24V 2A
11 Music Modes
Music Sync
11 Music Modes
Protective Coating
Alexa Control
16.4ft
Size
9.8ft
Bluetooth
Connectivity
WiFi, Bluetooth
RGBIC
Color
RGBIC+Warm Light
24V 0.5A
Min Input
24V 2A
11 Music Modes
Music Sync
11 Music Modes
Protective Coating
Alexa Control
16.4ft
Size
16.4ft
Bluetooth
Connectivity
WiFi, Bluetooth
RGBIC
Color
RGBIC
24V 0.5A
Min Input
24V 2A
11 Music Modes
Music Sync
11 Music Modes
Protective Coating
Alexa Control
16.4ft
Size
16.4ft
Bluetooth
Connectivity
WiFi, Bluetooth
RGBIC
Color
RGBIC+Warm Light
24V 0.5A
Min Input
24V 3A
11 Music Modes
Music Sync
11 Music Modes
Protective Coating
Alexa Control
Govee Strip Light H618F
 Govee Strip Light H61E5
  Govee Strip Light H61B5
  Govee Strip Light H61E1
Package Dimensions : 4.61 x 4.37 x 2.13 inches; 0.45 ounces
Item model number : H617A
Date First Available : July 9, 2021
Manufacturer : Govee
ASIN : B0991Q94KP
Country of Origin : ChinaSmart RGBIC Effects: RGBIC LED Christmas lights for bedroom display multiple colors on one line at a time compared with traditional RGB lights. A colorful combination of LED strip lighting for bedroom brings a strong visual impact for Christmas decorations. (Not Support Alexa)
Smart APP Control: You can unlock various features to personalize smart LED strip lighting for New Year via Govee Home App, getting rid of simple remote control. Adjust the colors and brightness to your preferences, turning a single light to vivid light shows for Christmas decorations.
DIY with Inspiration: You can choose from a variety of valentines lighting effects (16 million colors) and share your piece of art on the APP community. Also, we will regularly update AI-created themes on the APP to provide you with more options for LED Christmas lights.
Upgraded Music Sync Mode: Make your smart LED strip lighting for dance for an immersive home concert experience. Choose from 11 music modes and the integrated high-sensitivity mic will effortlessly sync with your favorite audio.
64+ Preset Scenes: Find the proper lighting effects that fit your emotions. You can choose from a selection of scenes to bring vivid colors, inspired by party, holidays-Christmas, movie and more with a simple click on the Govee Home App.
Note: Please wipe the surface well to make it clean and dry before intalling the smart LED strip lighting for Christmas decorations. Hair, dust and other stuff may affect the stickiness of the tape. (Not recommended for outdoor use.)SKU: n/a -
Smart LED Strips
meross Smart LED Strip Lights, 32.8ft WiFi RGB Light Strip, Works with Apple HomeKit, Siri, Alexa&Google and SmartThings, App Control, Color Changing Lights Strip for Room, TV, Holidays, Parties
 Smart LED Strips
meross Smart LED Strip Lights, 32.8ft WiFi RGB Light Strip, Works with Apple HomeKit, Siri, Alexa&Google and SmartThings, App Control, Color Changing Lights Strip for Room, TV, Holidays, Parties
From the brand


At Meross, we create products that empower people’s lives. We believe in making homes smarter and people’s lives easier. We believe everyone deserves a smart life, and it should be simple, smart, and stable.


Smart LED Lights
Popular Products from meross
Works with Apple HomeKit: Control LED light strips with Siri voice commands or Meross app directly.
Voice & App Control: Smart light strips are compatible with Apple HomeKit, Alexa, Google Home, SmartThings for convenient control.
Premium Bright RGB LEDs: Meross 32.8ft smart strip lights equipped with 300 LED beads for bright illumination.
Timer & Schedule: Set smart WiFi LED strip to brighten when waking up and gradually dim when sleeping for daily routine.
Offline Control: Meross app can be used locally to control lights even when internet is down.
Million Colors with Cuttable Design: Meross strip lights offer 16 million color options for perfect lighting effect.SKU: n/a
There are no reviews yet.